
When we started using our garage more, we started using our back door more too. Our back door is a sliding glass door, and we had no luck finding an Apple HomeKit compatible lock for that door. Going in and out of it with only a manual lock proved frustrating, so Alex and I decided we would try to build a lock ourselves and use Homebridge to connect it to our HomeKit network. This proved to be quite an undertaking that included designing a novel locking mechanism for the door, programming a microcontroller to engage that mechanism, and creating an accessory plugin for Homebridge to link it to HomeKit.
I will describe each of these elements below. We went down a number of blind alleys, which I will spare you. But the result is wonderful, so here is a spoiler video…
How to lock a sliding door?
Unlike your typical swinging door, a sliding glass door has very little room for a lock. These doors tend to be thiner than swinging doors and to have very little frame since they devote most of their area to glass. The lock on ours is very flimsy and yet requires quite a bit of force to engage (in fact, we often have to push on the door while turning it to fully engage its tiny latch). We quickly gave up on the idea that we would somehow install a “smart” version of this flimsy lock. In fact, we could not find any smart lock on the market designed for sliding doors.
We needed a mechanism that was both secure and that could be engaged by a small servo motor driven by some kind of controller. While we were able to get a servo to secure and unsecure a deadbolt, it was daunting to consider installing a deadbolt in such a way that it could properly prevent the sliding door from opening.
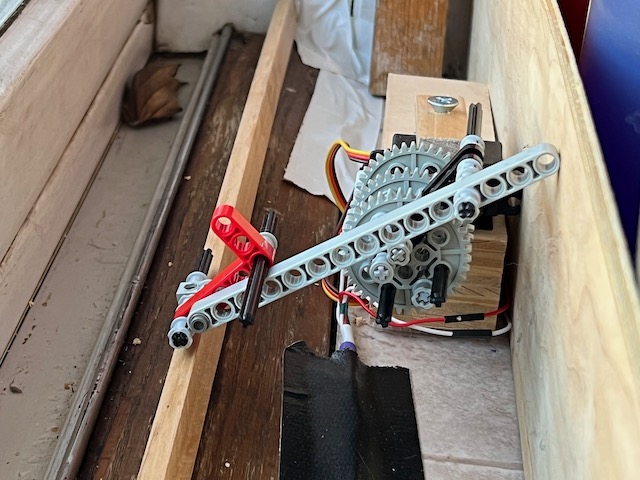
In the end, we invented a wholly new way to lock a sliding door. We realized that a long stick placed alongside the sliding door track would block the track and effectively lock the door. Even a very thin stick was enough to completely prevent the door from opening. If we made the stick of the correct rectangular profile, then when it was standing on its thin edge it would stand alongside the door and allow it to slide by, but lying on it fat edge it would cover a part of the track and block the door. Adding a hinge secured this stick to the floor in the correct position to serve as a locking mechanism.

Now all we needed was a way to push it onto its fat side or lift it again onto its thin side to secure and unsecure the “lock.” To do this we used some Lego Technic parts to translate the circular motion of our servo motor into the linear push and pull needed to engage the mechanism. Legos were prefect for allowing us to experiment and build the needed gears and levers in an organic way, but any number of other parts could have been used to accomplish this.

How to control a lock?
Once we proved a servo could do this job, we needed to design a device to manage the servo and connect it with buttons we could use to lock and unlock the door. Since we knew we would eventually want to remote control this device from HomeKit, we decided our controller needed to be able to connect to our wifi network. We chose the Adafruit ESP32-S2 Feather for the job, though in retrospect the slightly less expensive Adafruit QT Py ESP32-S2 would probably have been enough.

We combined this controller with a standard TowerPro SG-5010 servo to throw the lock. Again, in retrospect the less powerful micro TowerPro SG-92R servo would have probably been adequate.
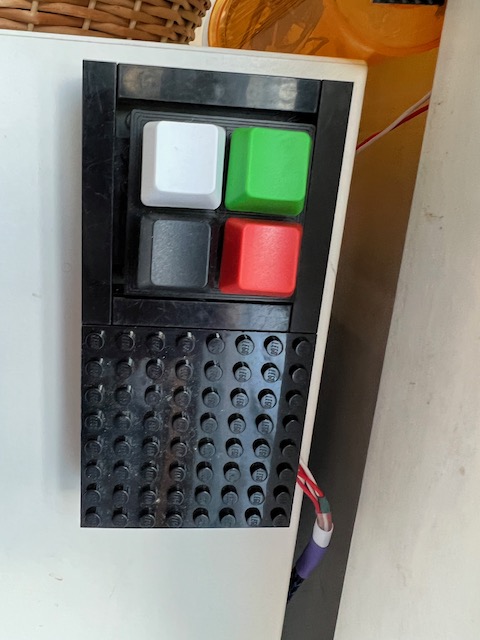
We also needed a button to toggle the lock. In the end we used four spare MX mechanical keyboard switches glued to an old switch tester frame for this purpose. I was able to connect these to the Feather with some creative soldering and wire. Basically, you can fashion a “momentary” switch out of anything that leave a circuit open until you touch it, so there are a bunch of options available for buttons like this. We used the extra button to signal Homebridge to engage in some other actions for us.
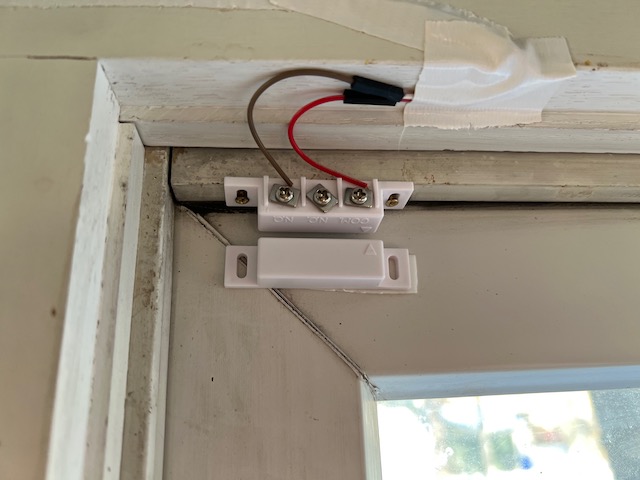
We wanted the lock to be able to sense whether the door was open, so that it could avoid trying to secure the lock when the door was in the way. To do this, I added a reed switch.

Finally, I had some old LEDs and resistors lying around and added an LED to serve as a warning from the outside that the door is locked. This red light just glows when locked so that we are reminded to unlock the door before we try opening it.
Here is how all this hardware was wired together (with the help of Fritzing)…

This image is obviously not to scale. One of the challenges was that we had some long (10 footish) runs of wire between the controller and items like the servo, LED, and reed switch. I discovered that a relatively inexpensive source of wire was something called “Bell Wire”. This is a 20 gauge solid copper core wire that is super easy to strip and work with. While stranded wire would have been more flexible, this solid wire was easy to plug into the Dupont style jumper cables that I used to connect to the microcontroller.
Hardware is only half the battle, we also needed software for the microcontroller. I chose to work in CircuitPython, which was available for the ESP32-S2 that we had chosen. I really enjoyed how easy it was to write and test the code in CircuitPython. I’ve put the code in a Gist in case you want to look at it.
How to connect a homemade device to Homebridge?
With this hardware and its CircuitPython code, we could talk to our lock over wifi. But really, we wanted this lock to be part of our HomeKit home. Apple’s HomeKit is a bit of a heavy lift for us, so we turned to Homebridge. We already used Homebridge to connect a number of devices that lacked direct HomeKit compatibility (cameras, a garage door, even a Wyze lock) to our own HomeKit home. We already had Homebridge up and running, so all we needed was a plugin compatible with our lock.
At first we used the terrific homebridge-web-lock plugin. We squashed a few bugs there and learned a lot about home Homebridge plugins work. These plugins are written in Javascript and imported into Homebridge itself as it launches. Unfortunately, this means that bugs in a plugin can take down a whole Homebridge installation! We found a few of those.
But our bigger concern was security. While HomeKit is pretty secure, the homebridge-web-lock API does nothing to defend itself from bad actors. We believe in assuming that bad actors have access to our home network and doing what we can to prevent their total victory. In this case, we wanted an API that at least send a one-time token along with each request so that a bad actor could not just watch our home network traffic and learn how to open the door. They would need to compromise our Homebridge installation to get control of our lock.
We implemented this one-time token as a simple random code that accompanies each request to our device (the Feather). The device would then confirm with the Homebridge plugin that the random code it received was valid before it executes the requested action (you can see this in the cody.py file in the Gist). The Homebridge plugin would delete each token as soon as it was validated (one-time, after all) and would also delete any tokens that have been sitting around for too long (just a couple seconds, by default).
This Homebridge plugin has been created as homebridge-smooth-lock. Feel free to take a look.
All of this was new to me. First time playing with microcontrollers, first time using CircuitPython, first time creating a Homebridge plugin, first time publishing an NPM package. So I imagine there is a good bit I got wrong. Please let me know what you think and if you have any suggestions for improvements!